System administrators that have a large environment of end-users to support often use Windows PowerShell to perform bulk operations on Active Directory user objects. These operations typically involve the following PowerShell cmdlets:
- Get-ADUser
- New-ADUser
- Remove-ADUser
- Set-ADUser
Let’s take a look at these cmdlets and see how we would use them to perform single and bulk operations.
New-ADUser
The first command we are going to look at is New-ADUser. Like the name implies, this command is used to create a new Active Directory user. Multiple parameters are available with this command that allow you to set common user property values. A complete list of parameters is available on Microsoft’s website. For now we are only going to focus on the more commonly used parameters:
- Name
- AccountPassword
- ChangePasswordAtLogon
- City
- Company
- Country
- Department
- DisplayName
- EmailAddress
- Enabled
- GivenName
- Initials
- Manager
- Name
- Office
- OfficePhone
- Path
- PasswordNeverExpires
- PasswordNotRequired
- PostalCode
- SamAccountName
- State
- StreetAddress
- Surname
- Title
- UserPrincipalName
Launch Windows PowerShell ISE and enter the New-ADUser command using the parameters listed above. At the very least, your syntax will need to include the Name parameter.
New-ADUser -Name “Charles Collab”
Once you run your syntax launch the Active Directory Users and Computers MMC snap-in and navigate to the built-in Users OU. A new user object Charles Collab has been created, but nothing else has been done to the object.
Since we did not specify any other parameters no other properties have been modified. In fact, the user object has not even been enabled. Now let’s run our syntax again but this time include some more parameters. Delete the user object you just created before and run your new syntax.
New-ADUser -Name “Charles Collab” -SamAccountName “charlescollab” -UserPrincipalName charlescollab@home.net -AccountPassword (ConvertTo-SecureString “H3ll0Ch@rl3s” -AsPlainText -force) -DisplayName “Charles Collab” -Surname “Charles” -GivenName “Collab” -Title “Systems Administrator” -Department “Information Technology” -Company “Collab Applications” -EmailAddress “ccollab@collabapplications.com” -Enabled $True
By using these parameters we are setting the following properties in Active Directory for the user object:
- Name – Name displayed in Active Directory
- SamAccountName – User logon name
- UserPrincipalName – User logon name (pre-Windows 2000)
- AccountPassword – User password
- DisplayName – Name displayed when using Microsoft software
- Surname – First name
- GivenName – Last name
- Title – Job title
- Department – Department user works for
- Company – Organization user works for
- EmailAddress – Corporate email address
- Enabled – User object status
Launch the Active Directory Users and Computers MMC snap-in and navigate to the built-in Users OU. The user object Charles Collab has been created and is now enabled. If we open Charles Collab’s properties, we can see the arguments we specified for the parameters in our syntax have been applied to the user object.


Fantastic– we now know the basic process for creating an Active Directory user with Windows PowerShell. Let’s make the creation process a little more organized by adding the parameter that specifies the OU where the user object will be placed.
If we add the parameter -Path, we can specify the distinguished name of the OU we would like to place the user object in.
-Path “OU=People,OU=ADROOT,DC=home,DC=net
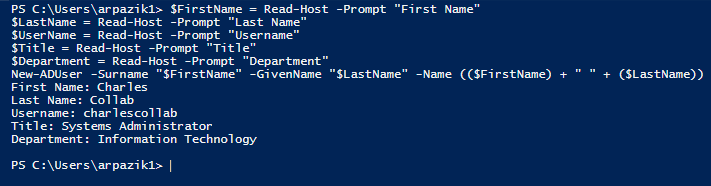
When you delete the user object you just created and run the script again, the user object will have been placed in the OU specified in the -Path parameter argument. Finally, since we plan to run this syntax for a lot of users, it would be in the best interest to write a script that asks for the unique information needed for each user object creation. We can accomplish this by using variables and input prompts in our script. Open PowerShell ISE and copy / paste the following:
$FirstName = Read-Host -Prompt “First Name”
$LastName = Read-Host -Prompt “Last Name”
$UserName = Read-Host -Prompt “Username”
$Title = Read-Host -Prompt “Title”
$Department = Read-Host -Prompt “Department”
New-ADUser -Surname “$FirstName” -GivenName “$LastName” -Name (($FirstName) + ” ” + ($LastName)) -SamAccountName “$UserName” -UserPrincipalName (($UserName) + (“@home.net”)) -AccountPassword (ConvertTo-SecureString “Password123” -AsPlainText -force) -DisplayName (($FirstName) + “” + ($LastName)) -Title “$Title” -Department “$Department” -Company “Collab Applications” -EmailAddress (($UserName) + (“@collabapplications.com”)) -Path “OU=People,OU=ADROOT,DC=home,DC=net -Enabled $True
What this script does is it allows you to enter five unique pieces of information about a user object and let Windows PowerShell do the rest. Make sure you change @home.net and @collabapplications.com to your organization’s Active Directory domain and email domain, respectively.
This script is good for occasionally adding user accounts with minimal Active Directory interaction. However, if you plan to bulk add hundreds of users I advise you to improve the script and allow it to read and sort data from a CSV file that contains the necessary information for each user object.
In my next post, I will be discussing the Get-ADUser cmdlet and the parameters available for it.
